

Let’s talk about PANEER!
I’ll be honest. Paneer is one of the ingredients I really don’t feel that I’ve mastered yet. That’s not to say that I’ll truly master any ingredient—but there’s a lot of paneer recipes and techniques I haven’t approached yet, mostly because I haven’t found or developed the right recipe yet, and they’re pretty labor intensive just to experiment with them (I’m talking paneer tikka masala, saag paneer, and others).
So, I can understand how many home cooks might be wary of this ingredient. That said, I have a few go-to paneer recipes that make me really happy, and make me excited to buy paneer! And after a suggestion from a friend (thanks, Beth!), I thought it would be a great idea to share them with you, and share some of my methods. So let’s talk about this interesting, unique cheese.
What is paneer?
Paneer is a cheese made from cow or buffalo milk, that isn’t aged. Because you don’t have to age it, you can actually make it at home—it’s definitely a process, but a fun one, like making fresh pasta! The flavor is very mildly cheesy—even if you don’t like cheese, you’ll most likely be fine with paneer. It mostly takes on the flavors you give it (like my other fave, tofu!). And the texture is unique too. People often liken it to cottage cheese, but I think that does a disservice to the varied textures you can get from paneer! When it’s fresh and uncooked, it’s pretty stiff and one-note. But once you add heat, cubes of paneer become bouncy and squeaky or soft and smooth, and you can even get the outsides crispy! Which brings me to my next section:
How do I prepare paneer?
There are, of course, so many ways. Paneer can be fried, baked, braised, and sautéd! It can even be grilled!! (I think you can also eat it raw, but…why would you when you could do all those other things?)
If you’re first approaching paneer, a really simple but delicious way is to just sauté it in olive oil or ghee, and add spices once the outsides have browned. Paneer pairs well with strong flavors, like cumin and other spices, onions, chutneys, and tomato sauce! I think a lot about the texture when I’m preparing paneer, to decide what I’d like to pair it with. Paneer and potatoes, for example, are very tasty, but can end up creating a one-note, somewhat dry and starchy-feeling dish. Pairing paneer with bell peppers and onions though, or yogurt and rice, or a sauce, will be more successful! Paneer is really easy to chop, so you can get it all crumbly if you want (like for my sausage rolls), or you can slice it cleanly so it keeps its shape (like for my paneer tikka).
How do I get and store paneer?
At this point, you can probably find paneer at your local Whole Foods or Trader Joe’s. If you have a South Asian grocery store near you, though, I recommend getting it there! (There are lots of brands, like any type of cheese, but I like Swad or Amul.) When you’re storing it, paneer is like any other cheese—it only keeps for so long in the fridge. So, I’m a big fan of FREEZING your paneer! Yes, like tofu, and like so many other things a solo home-cook discovers, you can freeze paneer! You can thaw it quickly by putting the package in a bowl of very hot water, or more slowly by leaving it in the fridge for a day or two. Paneer will keep for months in the freezer. But once you thaw it, make sure to use it within the week. If you’re just one person and your package of paneer is pretty big, you can chop it up and freeze it in separate bags, so you only need to thaw a small section at a time.
And there are you have it! The (very) basics of paneer.
Below are four of my go-to paneer recipes! As I said, I am certainly no expert on paneer, though I wish I were. But that just makes me more excited to come up with these recipes, and share this newsletter. I’d love to get more tips from you, and hear your go-to paneer recipes! There’s so much more to discover—when I create an at-home paneer tikka masala recipe that I absolutely LOVE, I will excitedly and immediately share that with you. Until then, give these recipes a try, and enjoy experimenting with this lovely cheese!
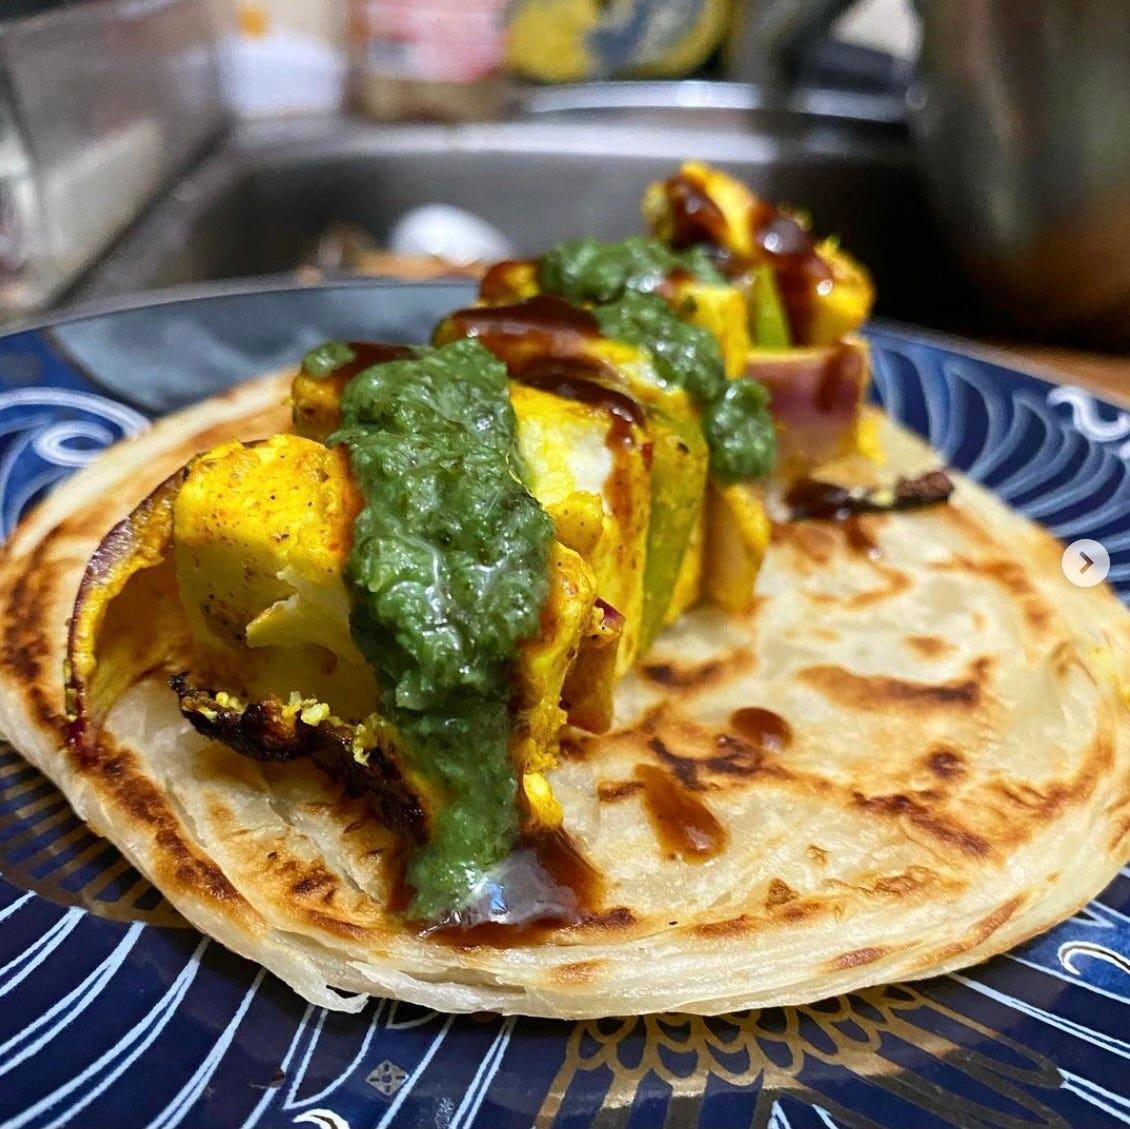
Paneer tikka
Time: 2+ hours | Difficulty: 3/5 | Recommendation: Weeknight dinner
Paneer tikka! A classic. When I first discovered that the way to do this is to marinate the paneer in yogurt, I was honestly confused. Dairy marinating in dairy?? What a concept! But hey, it works. And adding a touch of chickpea flour brings everything together, and makes it so the marinade doesn’t drip off the cheese. I think it’s best to pair the paneer with red onions and red and green bell peppers, but you could add other vegetables too if you wanted! This recipe also makes a lot of leftovers, but don’t worry, these are GREAT as leftovers. Wrap them in a roti or naan or parotta, or add them to a normal sandwich, or eat with some rice, or even a lettuce wrap? Endless possibilities!!
Ingredients/Tools:
1 block of paneer, chopped in half, then 1/2-inch squares
Yogurt (about two cups)
1 bell pepper, chopped into squares
1 red onion, chopped into squares
Spices: Turmeric, paprika, cumin powder, coriander powder, tandoori powder, garam masala, chili powder, salt, pepper
Chickpea flour (about a tablespoon)
Peanut or vegetable oil
Mustard seeds
Chili flakes
Cumin seeds
A big bowl
Wooden skewers (soaked in water so the ingredients don’t stick!)
A ridged skillet (or a grill if you’re into that)
Method:
Add the yogurt and spices to a big bowl, and stir to combine. Add the paneer, bell pepper, and onion, and toss it all. Marinate in the fridge for at least an hour.
When you’re done marinating, make the tadka: in a small pan, heat a couple tablespoons of vegetable oil with the mustard seeds, chili flakes, and cumin seeds. When it all starts to sizzle, add the tablespoon of chickpea flour. Immediately pour it over the marinated paneer, and stir to combine.
Skewer the paneer! Alternate between the cheese squares and the bell pepper or onion squares, three or four to a skewer. Keep as much of the marinade on the ingredients as possible.
Heat a touch of oil in the pan, and add the skewers when it’s hot. Let the paneer cook for a couple minutes on each side, on high heat, and turn when the first side is cooked. (If you don’t have a ridged cast-iron, you can also bake the paneer on a sheet pan!)
Enjoy with tamarind and coriander chutneys, a squeeze of lemon, and some fresh coriander!
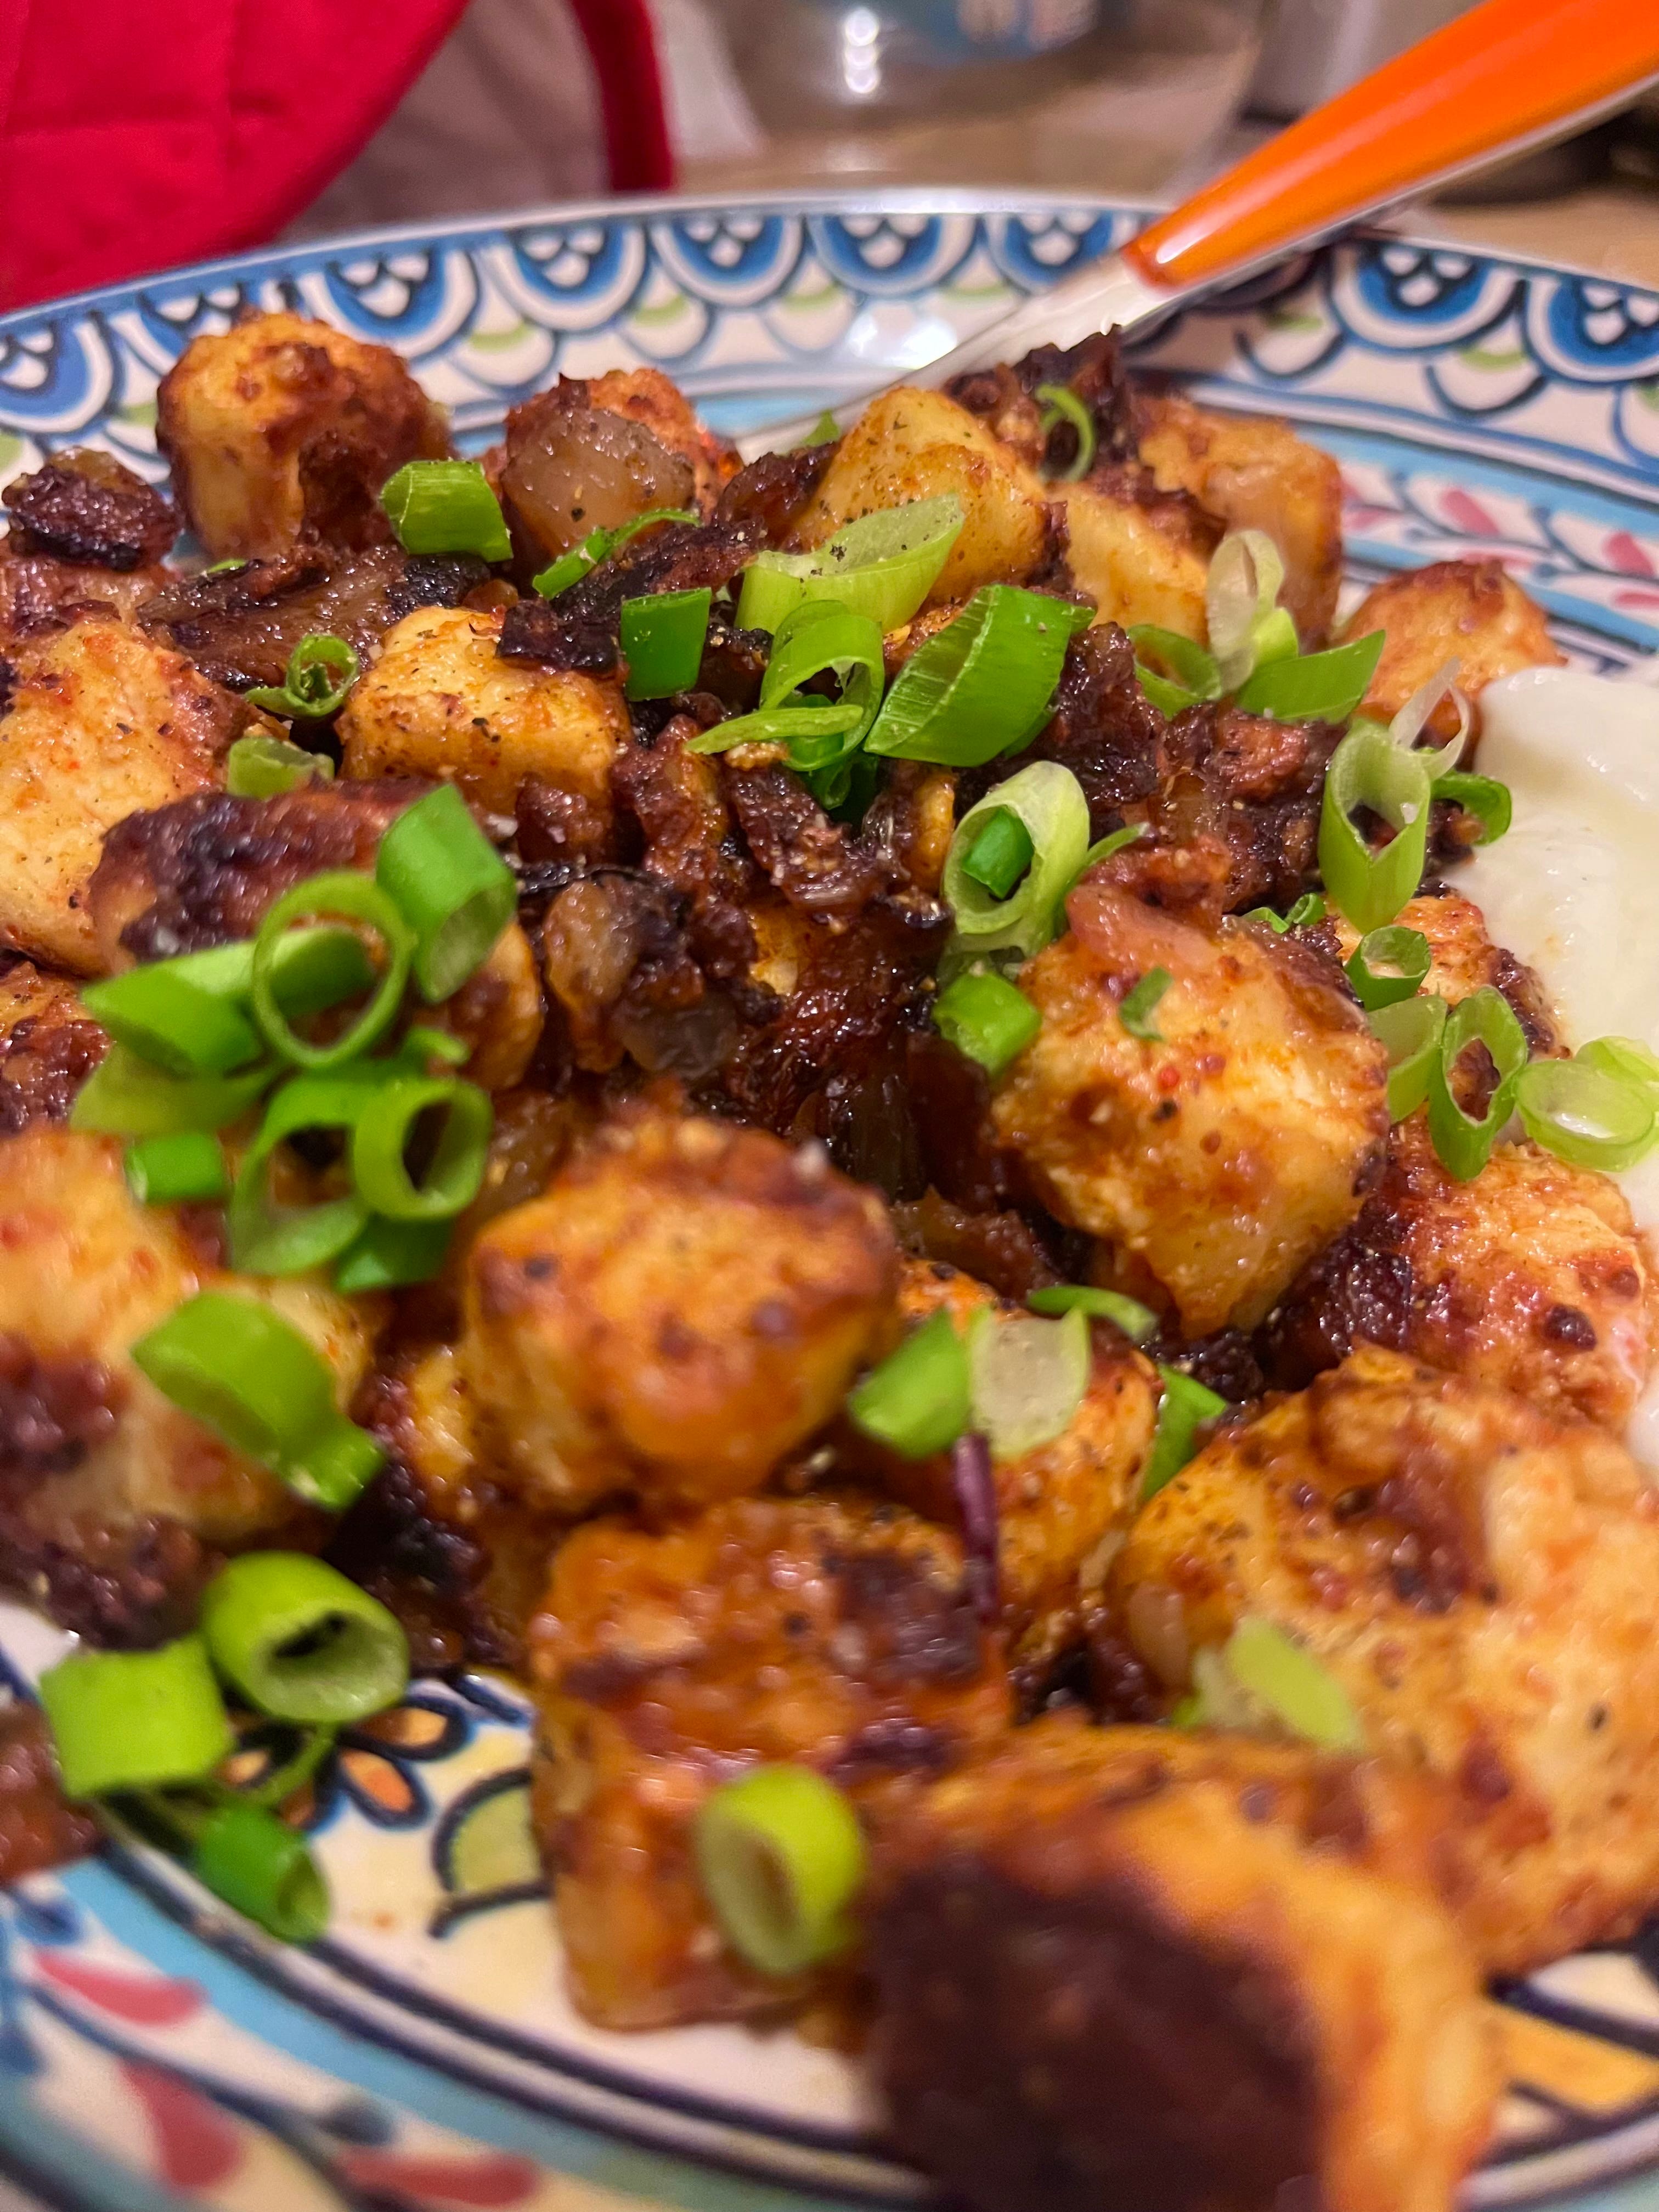
Honey mustard-glazed paneer
Time: 30 mins | Difficulty: 2/5 | Recommendation: Weeknight dinner
I love finding new ways to prepare paneer, and I love finding ways to incorporate my favorite condiment (mustard) into recipes! This dish combines both those joys. I got the idea from a recipe from Maille, the French mustard company, but I’ve adapted it to use a few more ingredients and be fit for one person. I recommend serving this with yogurt or rice (or yogurt AND rice) on the side, and scallions on top!!
Ingredients:
1/2 block of paneer
Cornstarch (about 2 tablespoons)
1/2 an onion
2 cloves garlic
Scallions, chopped
Honey mustard (a couple teaspoons)
Dijon mustard (about half a teaspoon)
Hot sauce or Gochujang
Soy sauce (about a teaspoon)
Rice vinegar
Coriander powder
Chili powder
Method:
Chop the paneer into cubes. Chop the onions and mince the garlic.
Put the paneer in a big bowl, and add the cornstarch. Toss to coat, and set aside.
In some olive oil, sauté the onions and garlic until they are softened. Set aside.
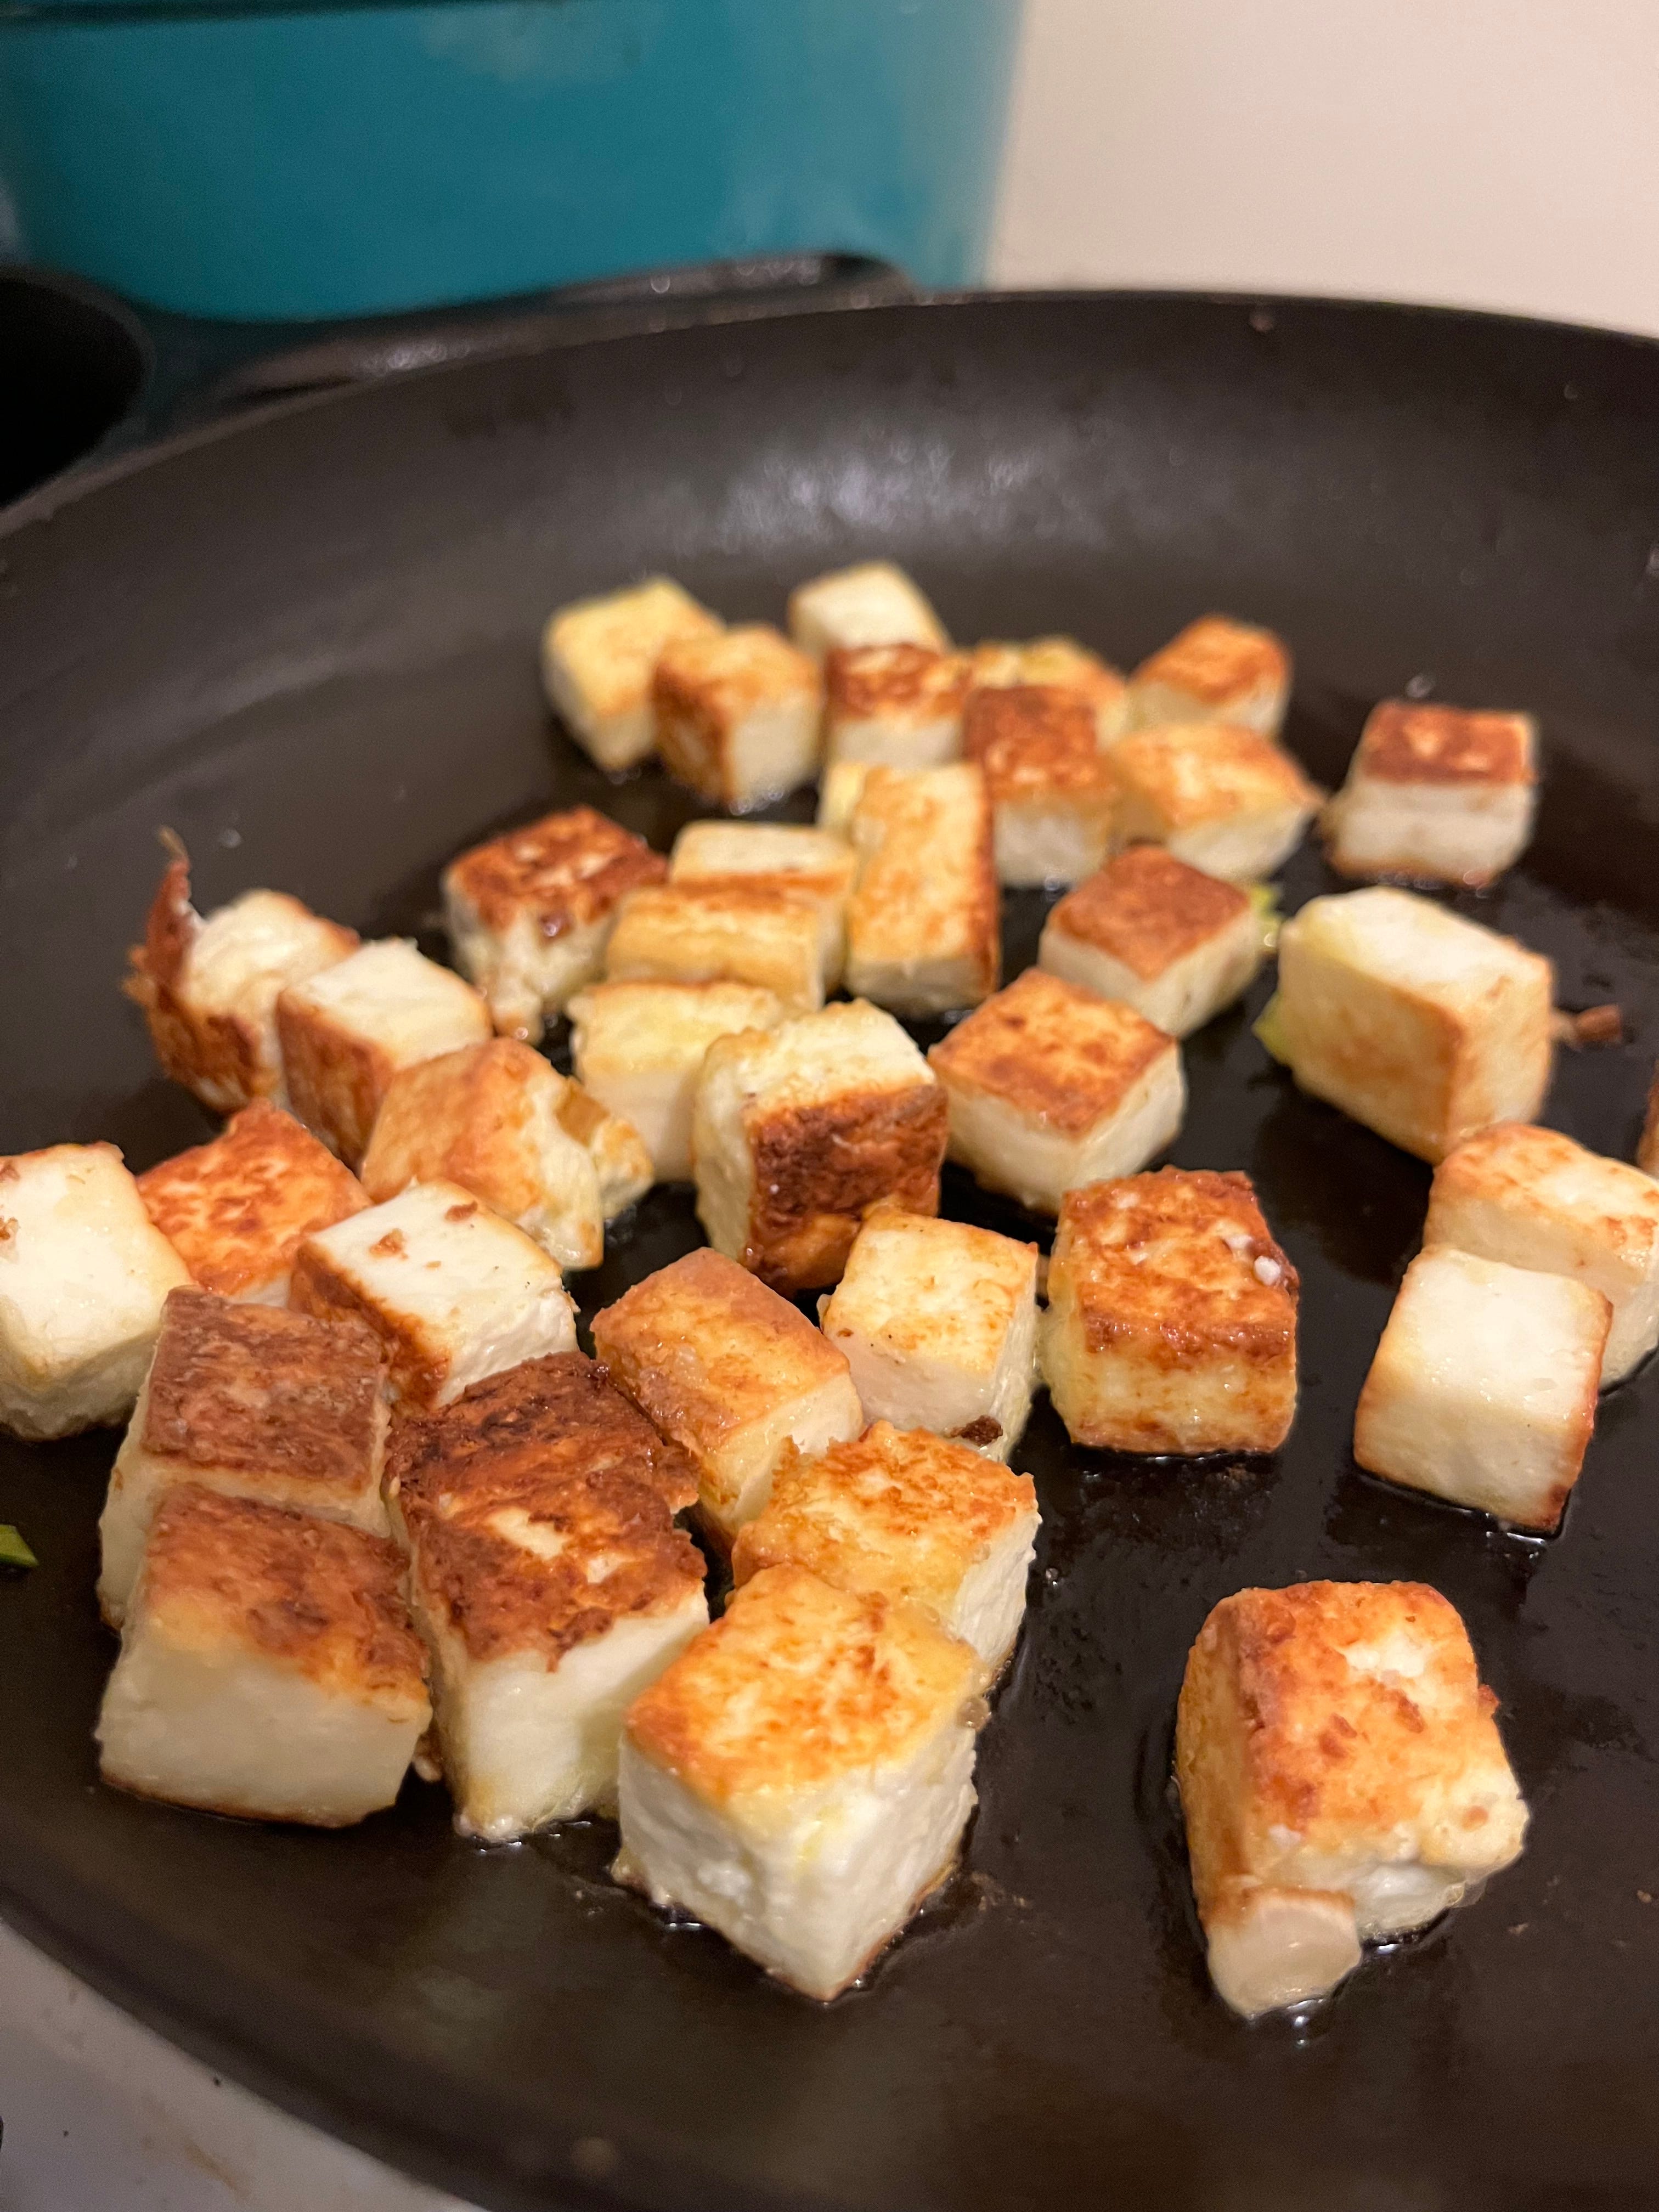
In the same pan, sauté the paneer on medium-high heat, making sure all the sides get browned and crispy. (This will take about 10 minutes.) Add salt and pepper at the end.
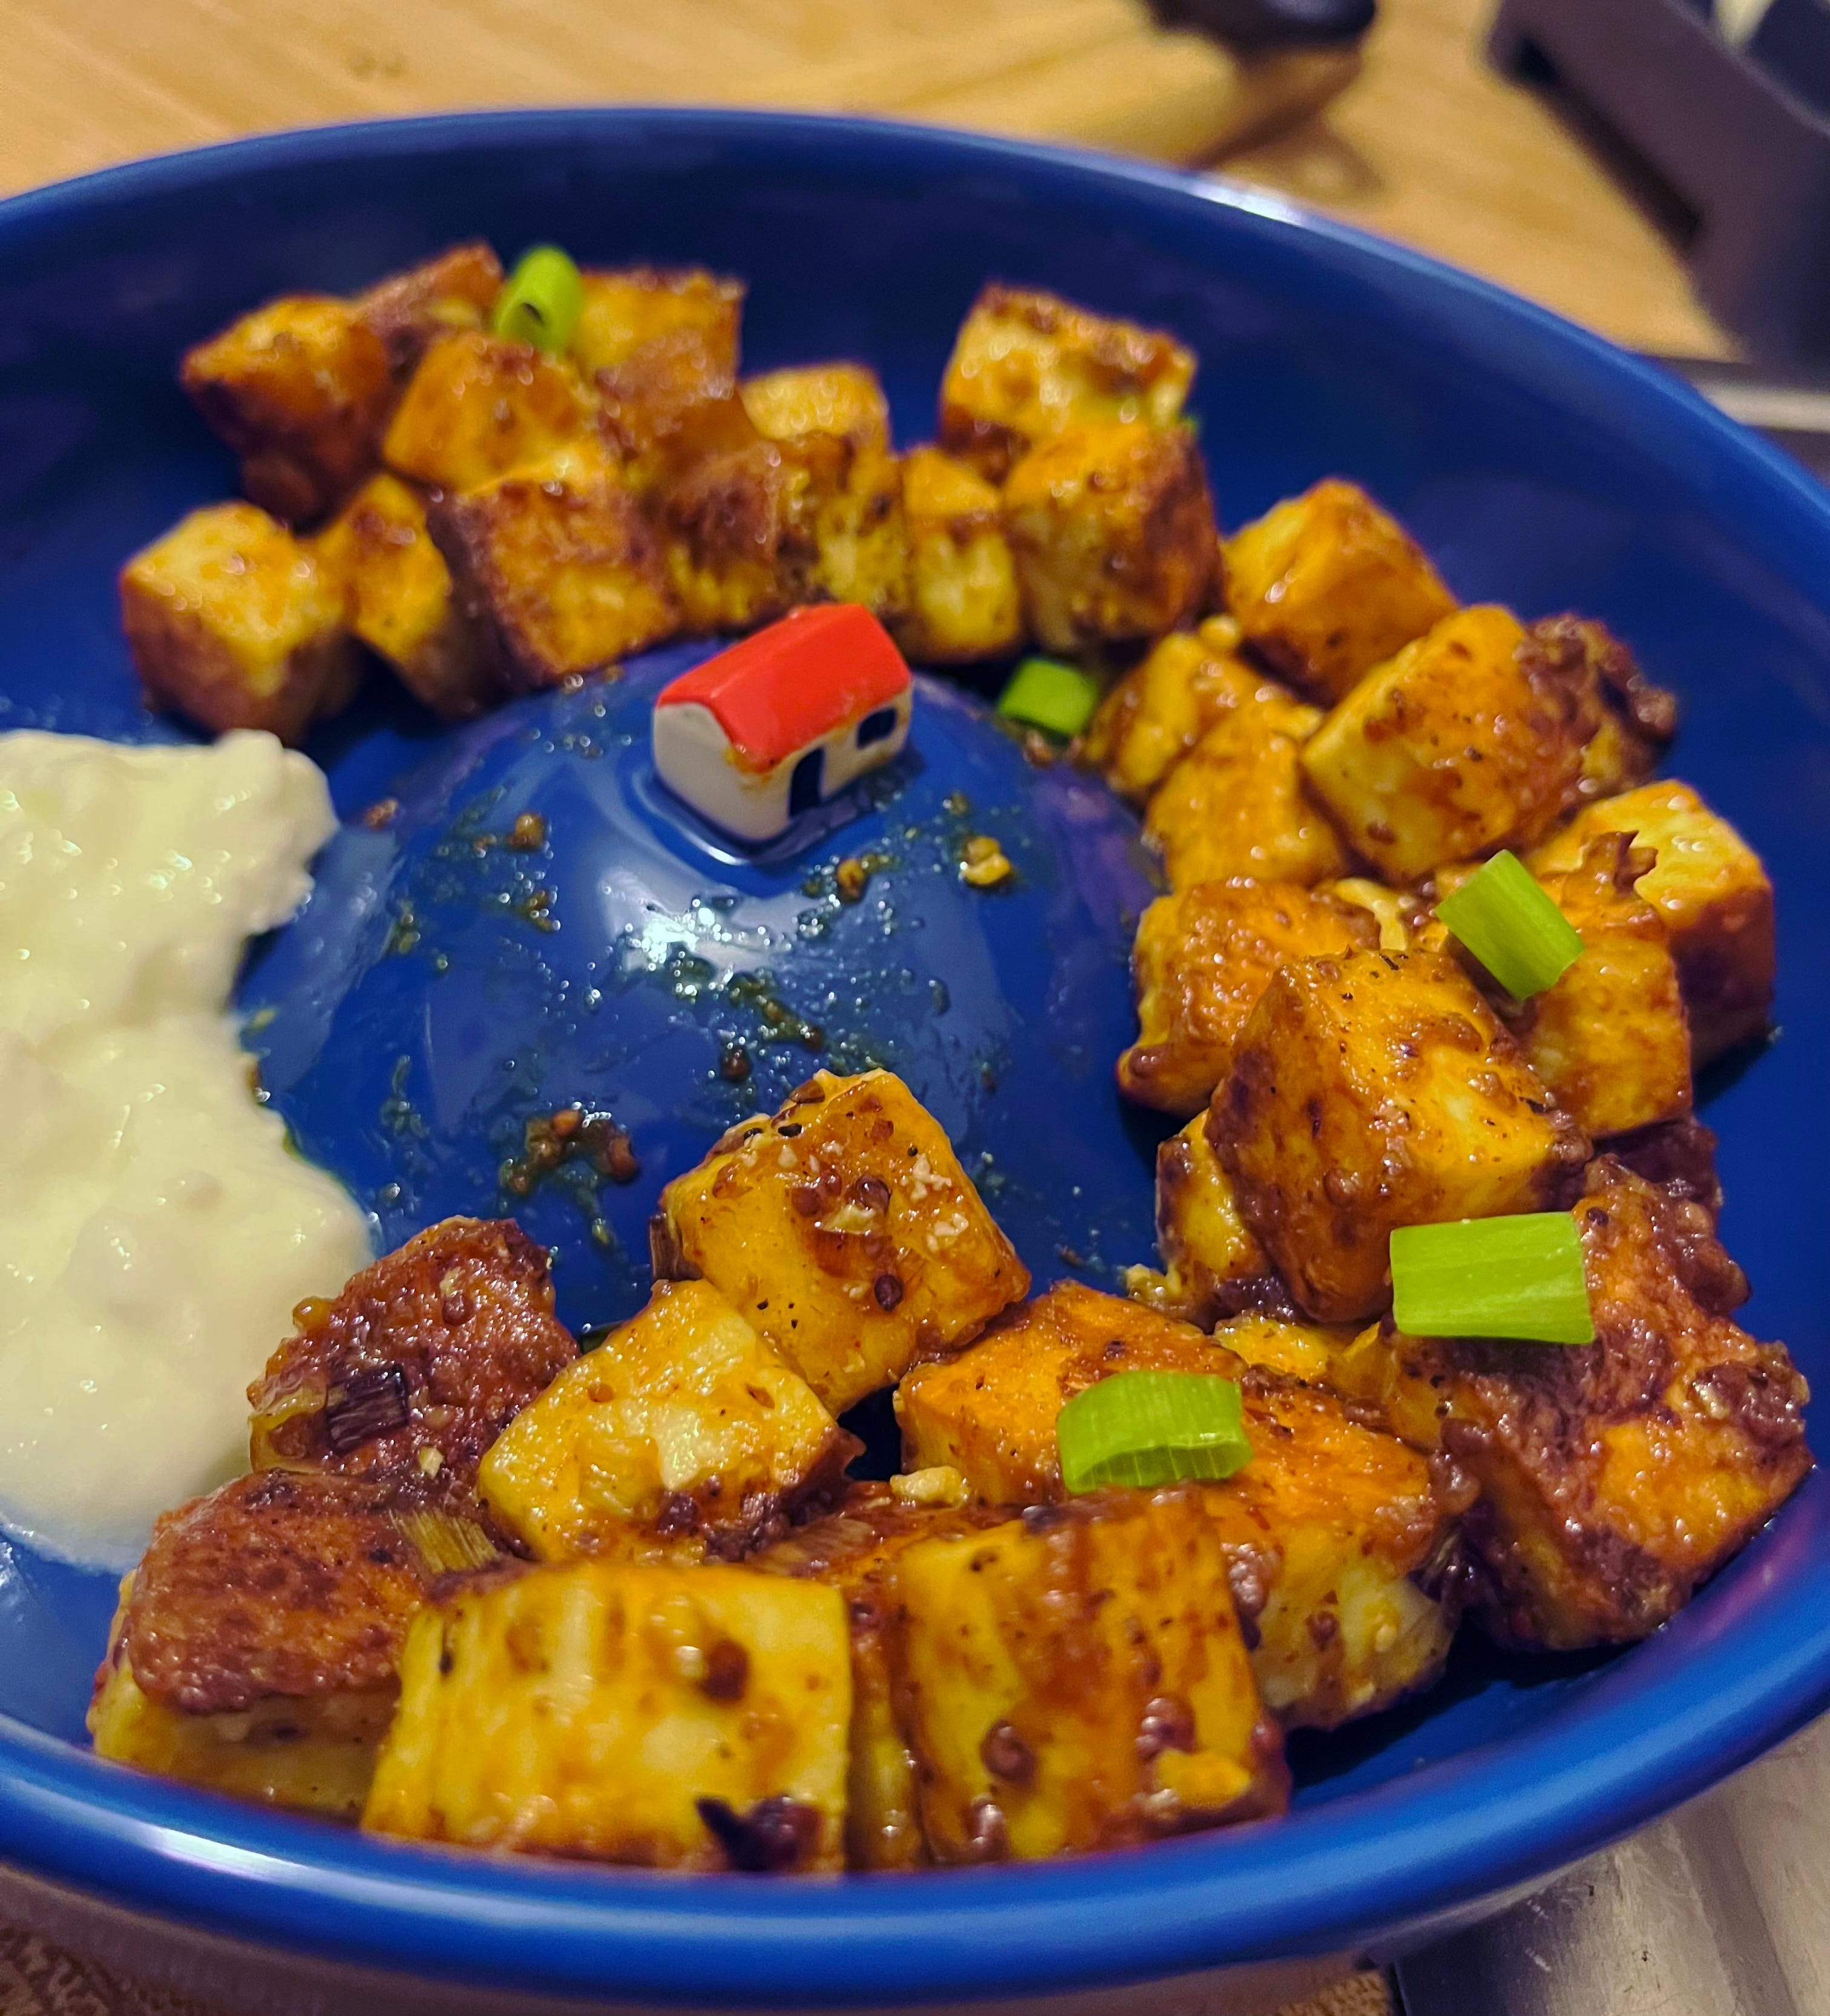
As the paneer is cooking, make the sauce: Add the honey mustard, dijon mustard, soy sauce, a splash of rice vinegar, and a squeeze of hot sauce to a bowl. Mix well, then add the spices. Mix again and add just a touch of water to slacken the sauce.
Add the onions and garlic back into the pan, and sauté everything briefly to combine all the flavors. Then turn the heat to low, and add the sauce into the pan. Stir everything together and make sure it’s all coated, and let the sauce begin to thicken and stick to the paneer.
When it’s all sticky and done, transfer the paneer to a bowl and sprinkle the scallions on top! Serve with yogurt, rice, and/or naan.

Paneer (sausage) rolls
Time: 1 hour | Difficulty: 4/5 | Yield: 12 rolls
I got the idea for these paneer rolls when I was really craving a sausage roll, but didn’t have any sausage. I realized, the real appeal of a sausage roll is not just the taste of the meat, but the play between the flaky puff pastry and the soft, spicy interior. So I thought, why not try it out with paneer, instead? And it worked great! Some key tips here: I describe that you want to crumble up the paneer in the pan as you cook it, to resemble sausage crumbles. But don’t overdo it! A lot of the satisfaction here comes from how the paneer gets all squeaky and squishy, and it only achieves that if the crumbles are still pretty substantial in size. And on the cooking note—the goal is to incorporate the spices, and get a fair amount of the moisture out of the paneer so it doesn’t weigh down the puff pastry. But I’ll say again—don’t overdo it! If you cook the paneer in the pan for too long, it will be overcooked and dry by the time you’ve taken them out of the oven, during their second cook. Just a couple minutes is fine—enough time to get the spices fully in the paneer. Lastly, this makes 12 rolls if you use a whole block of paneer and a whole roll of puff pastry. They make great leftovers (just microwave them or eat them cold), but if you don’t want leftovers, I recommend scaling this down by 3.
Ingredients/special tools:
1 block of paneer, chopped into small bits
Ghee
Spices: turmeric, cumin powder, coriander powder, paprika, chili flakes, salt, pepper
Cumin seeds
1 roll of frozen puff pastry, thawed
A pizza cutter (or a big knife)
Sheet pan
Baking parchment
Rolling pin
Method:
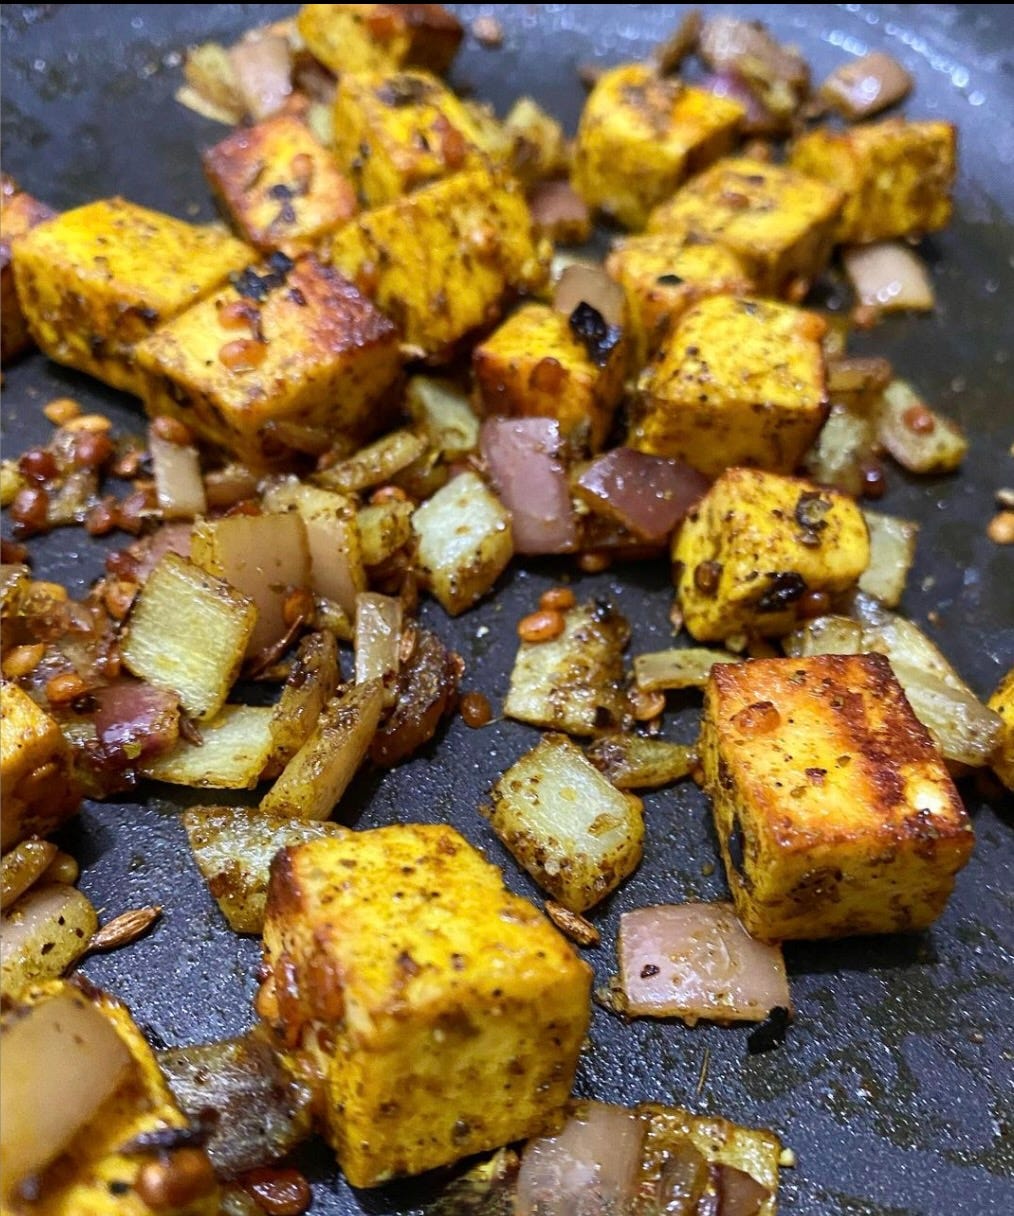
Melt some ghee in a pan. Add the paneer and the spices. Sauté the paneer in the spices, chopping it up with your spatula if any of the pieces look too big. After a few minutes, when the paneer is warmed through and all the spices have been incorporated, turn off the heat.
Pre-heat the oven to 400°.
Line the sheet pan with the baking parchment, and roll out the puff pastry with a rolling pin. Slice it into three strips.
Pile the paneer along the right side of each of the pastry strips. Then fold the other side over, and pinch the edges together. (If they don’t stick, just wet your fingers as you’re crimping the edges).
Slice the strips into 3-ish-inch sections, so you have about 12 individual rolls.
Brush the top of each roll with some ghee, then sprinkle cumin seeds on top.
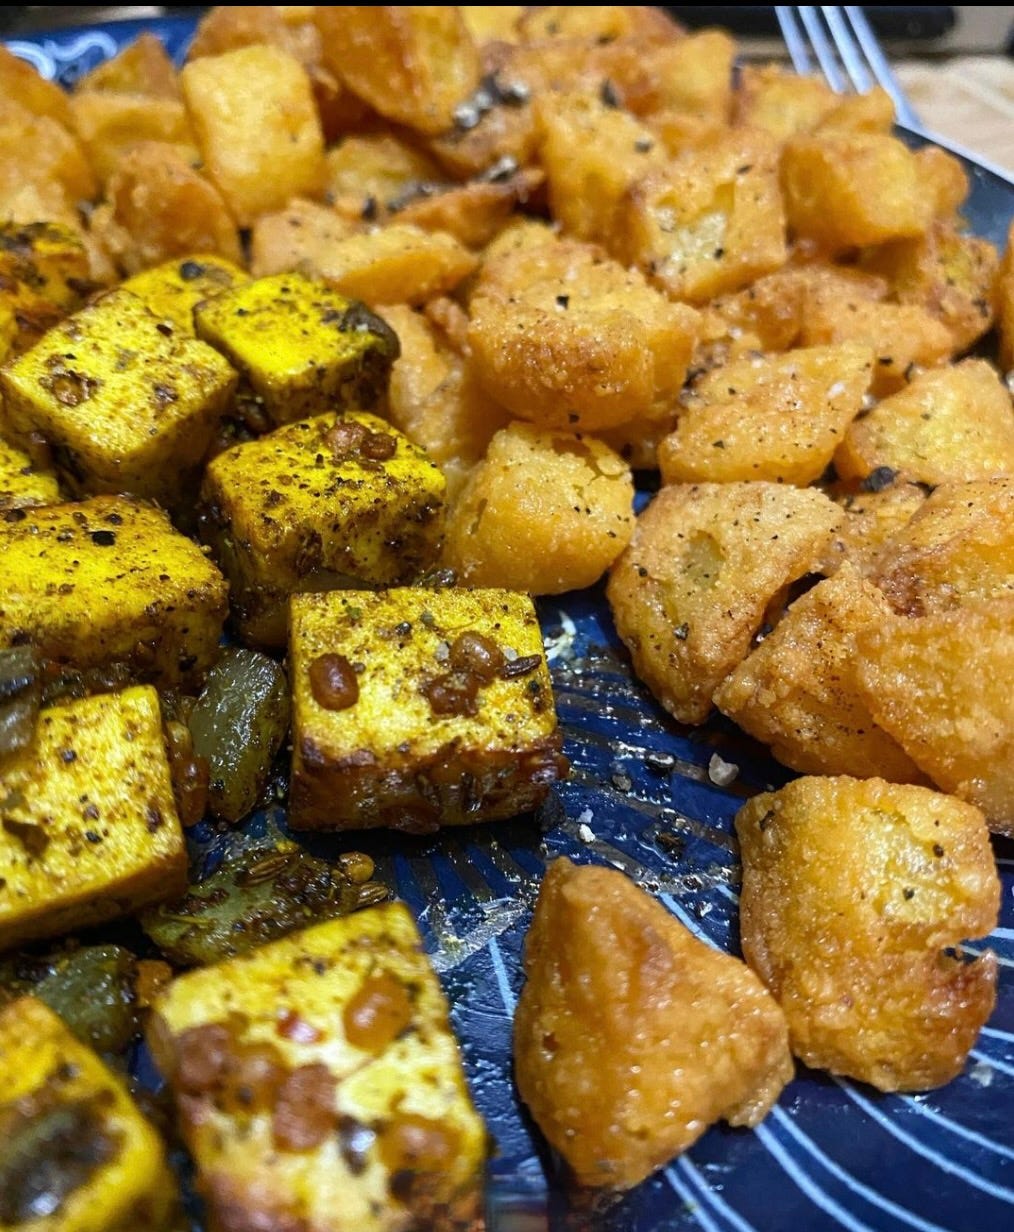
Bake for about 20 minutes, until the puff pastry is puffy and golden! Enjoy with tamarind chutney, tomato chutney, and/or yogurt.

Paneer Pakoras
Time: 45 mins | Difficulty: 3/5 | Recommendation: Dinner or make to share
Paneer pakoras are just the best! They’re a great restaurant appetizer, with a nutty batter full of cumin seeds and spices, surrounding the soft, spongey paneer. But did you know you can also make them at home?? And since it’s just you at home cooking, you find yourself with extra batter after frying up the paneer, you can add in something else and make new pakoras! E.g. onions, apples, zucchini flowers, even mushrooms…
Ingredients/tools:
Paneer (about half a block for one person plus leftovers)
About 1 cup chickpea flour
About 1 cup water
Vegetable oil
Spices
Garam masala
Chaat masala
Chili powder
Cumin seeds
Cumin powder
Turmeric
Ginger powder
Salt
Pepper
A wok or heavy bottomed pot
A big bowl
Metal slotted spoon
Tongs
Paper towels
Method:
Slice the paneer into squares that are about 1/4 inch thick.
Transfer to a small bowl and add garam masala, chaat masala, chili powder, and a touch of salt. Mix with your hands.
Make the batter: dump a cup of chickpea flour into a big bowl. Add in cumin seeds, cumin powder, chili powder, turmeric, ginger powder, salt, and pepper, and mix well. Slowly add in the cup of water, whisking until you get a pretty thick batter that slowly drops off the whisk as you hold it up.
Dunk the paneer squares in the batter and coat them fully. Heat some oil in the wok.
Fry the paneer in the hot oil, turning once when the bottom is starting to brown. Make sure to only fry three or four at a time, so the oil doesn’t cool down too much.
Drain on a paper towel. Enjoy with tamarind sauce or coriander chutney!